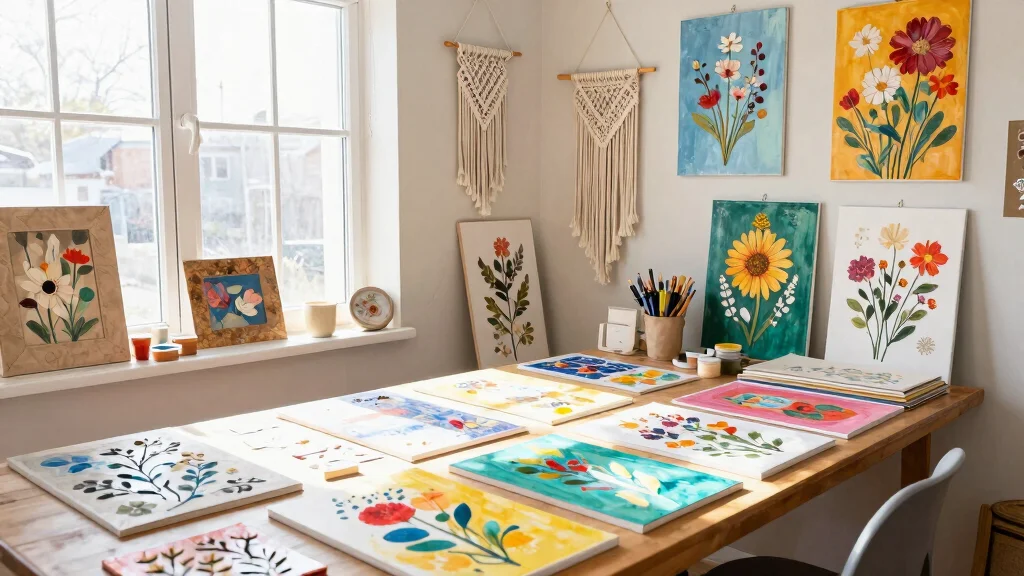
Creating a cozy and inviting space makes all the difference in your home. As the weekend approaches, you might find yourself craving a fun project that adds personality to your walls. I made this post to inspire you with some fantastic and easy wall art DIY ideas that bring a touch of creativity into your home decor. If you’re someone who loves crafting or wants to spruce up your living space without breaking the bank, this is the perfect collection for you.
This guide is tailored for weekend warriors, DIY enthusiasts, and anyone looking to transform their spaces with unique and sustainable wall art. You’ll discover 20 projects that are not only fun to make but also allow you to express your style and values. Each project is designed to be simple enough to complete in a weekend, utilizing materials you might already have at home or can easily source. By the end of this post, you’ll feel inspired and ready to create beautiful wall decorations that reflect your personality while also being eco-friendly.
Get ready to dive into a world of creativity! Whether you’re into painting, crafting with nature, or upcycling materials, there’s a project here for everyone. Let’s begin this artistic journey and see how you can elevate your home decor with these engaging DIY wall art ideas.
Key Takeaways
– Diverse Projects: Explore 20 DIY wall art projects that range from upcycled fabrics to nature-inspired art, ensuring there’s something for everyone.
– Sustainable Materials: Many of the ideas focus on using recycled or natural materials, making it easy to create art that is both beautiful and eco-friendly.
– Weekend Friendly: Each project is designed to be completed in a weekend, perfect for those looking to spend their free time creatively.
– Easy to Follow: The ideas are straightforward, allowing you to dive right into crafting without needing advanced skills or a lot of time.
– Personalized Touch: These wall art projects are a great way to add personal flair to your home, reflecting your style and interests while beautifying your space.
1. Upcycled Fabric Wall Hanging

Upcycling old fabric scraps into a wall hanging is a brilliant way to introduce texture and warmth into your home. The blend of varying colors and patterns creates a visually striking piece that captures attention. Consider using cotton, linen, or even repurposed clothing to craft something unique that resonates with your personal style.
To implement this idea, think about selecting fabrics that complement your existing decor. This project is not only budget-friendly but also a fantastic way to contribute to sustainability by repurposing materials. You can easily adapt this art piece to match any season or occasion.
– Pair bright cotton scraps with neutral tones for balance.
– Install using a wooden dowel to create a clean finish.
– Use scalloped edges or fringe for added interest.
– Incorporate dried flowers or greenery for a natural touch.
By mixing textures and colors, you can create a cozy atmosphere that feels both inviting and personal.
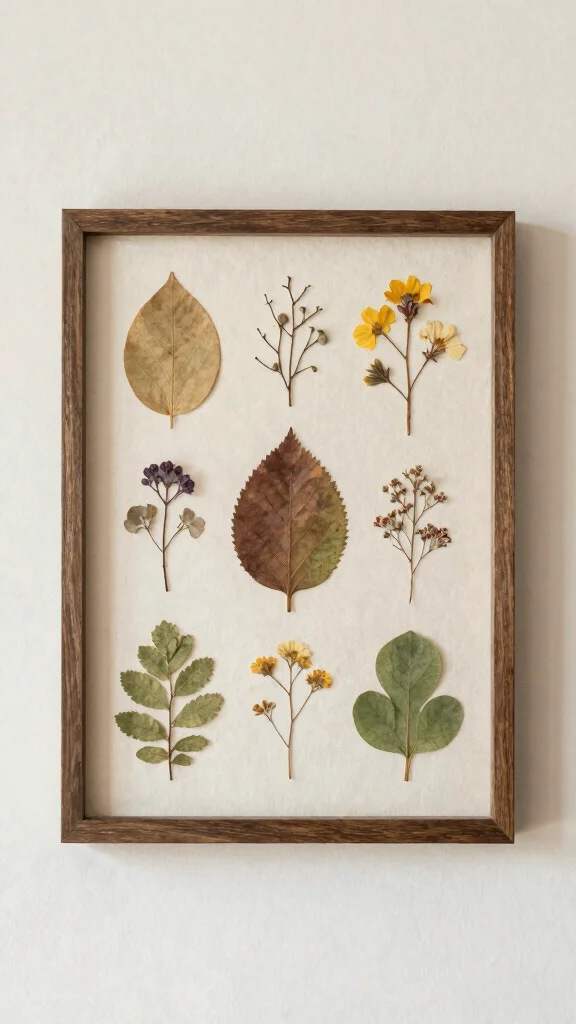
2. Nature-Inspired Pressed Flower Art
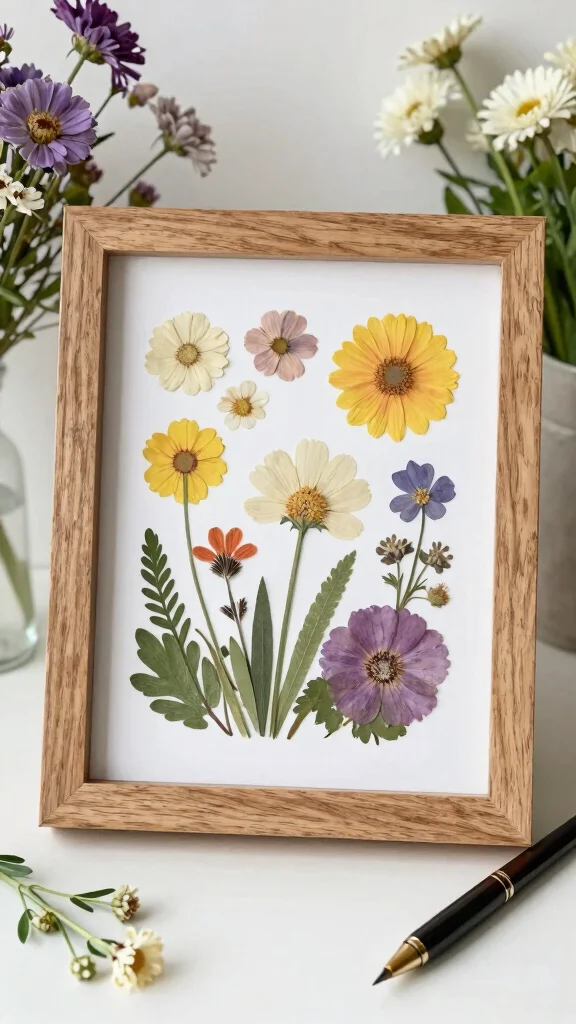
Pressed flower art invites the beauty of nature into your home, transforming delicate blooms into lasting memories. This timeless technique preserves the essence of your favorite flowers, making it a heartfelt addition to any room. Gather flowers and leaves from your garden or during a special occasion, and allow their colors to shine through in your artwork.
To get started, simply press your collected flowers between heavy book pages for about a week. Once dried, you can arrange them on a canvas or in a frame for a stunning presentation. This project not only celebrates nature but also brings a sense of calm and nostalgia to your decor.
– Collect seasonal flowers and leaves for vibrant colors.
– Secure them with clear adhesive or mod podge for a lasting effect.
– Frame the arrangement to add a polished finish.
– Personalize with hand-lettered quotes to enhance the theme.
This art piece captures the essence of nature and serves as a beautiful reminder of cherished moments.
3. Hand-Painted Canvas Art

Hand-painted canvas art is a fantastic way to unleash your creativity while adding a personal touch to your home. By choosing a color palette that resonates with your personality, you can create a unique masterpiece that transforms your space. Whether you opt for calming hues or bold statements, each brushstroke reflects your artistic journey.
Gather some acrylic paints, a blank canvas, and brushes to bring your vision to life. This project is all about freedom—there are no rules! Once completed, your artwork will enhance the ambiance of any room, making it feel more like home.
– Choose a color palette that aligns with your decor.
– Use painter’s tape for clean lines in geometric designs.
– Experiment with layering techniques for depth and interest.
– Allow it to dry completely before hanging for the best results.
Your hand-painted canvas will not only brighten up your walls but also serve as a constant reminder of your creativity.
Did you know that 78% of people say handmade wall art boosts mood more than mass-produced prints? With hand-painted canvas art, you can customize color palettes and finish, making every brushstroke reflect your wall art diy journey.
4. Pallet Wood Photo Display
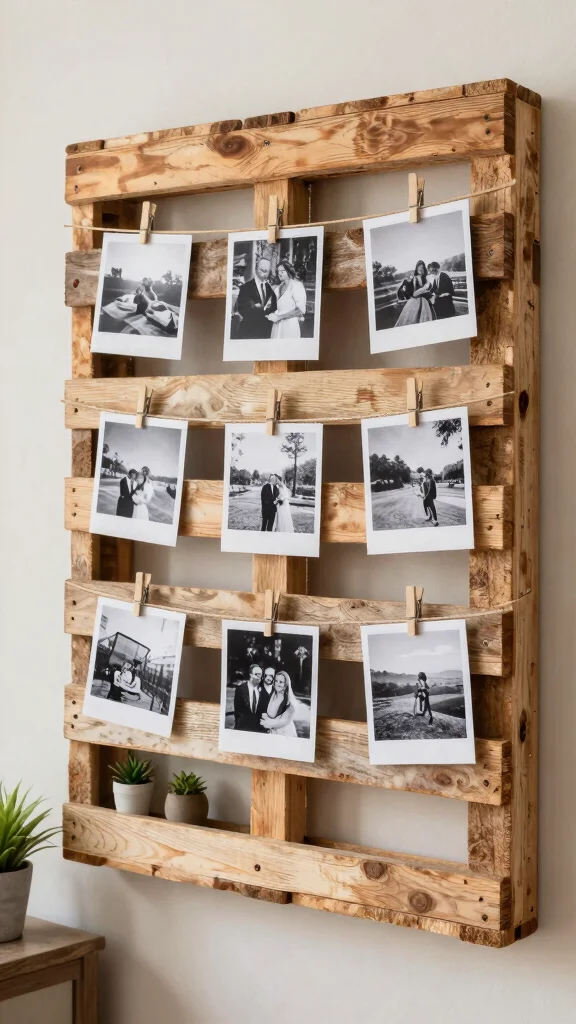
Transforming an old pallet into a photo display adds a rustic charm while showcasing your favorite memories. This DIY project is not only environmentally friendly but also serves as a unique focal point in your home. By combining personal photos with natural wood, you can create a warm and inviting atmosphere.
Start by sanding down the pallet to prepare it for decoration. You can choose to leave it natural or apply a wood stain for a richer look. Attaching clips or clothespins allows you to easily swap out photos, making this display versatile and dynamic.
– Secure clips or clothespins to the wood using hot glue.
– Hang it in a prominent area to create a visual impact.
– Mix in postcards or artwork for added layers.
– Use twine to enhance the rustic aesthetic.
This photo display is not just functional; it also tells a story, inviting guests to engage with your memories.
5. Colorful Paper Mache Wall Art
Dive into the playful world of colorful paper mache wall art! This eco-friendly craft is perfect for all ages and encourages creativity using materials you already have at home. With a few simple steps, you can transform scrap paper into a vibrant piece that adds character to your walls.
Gather old newspapers, magazines, or any scrap paper, and prepare a glue mixture with flour and water. Layer the strips over a balloon or mold, and once dry, unleash your artistic flair with bright paints. This project not only results in a stunning statement piece but also serves as a fun family activity.
– Tear paper into strips for easy handling.
– Use a balloon or mold to shape your art.
– Allow it to dry thoroughly before painting.
– Choose non-toxic paints for a safer craft experience.
Your paper mache creation will surely spark conversations and brighten up any space.
6. String Art Wall Hanging
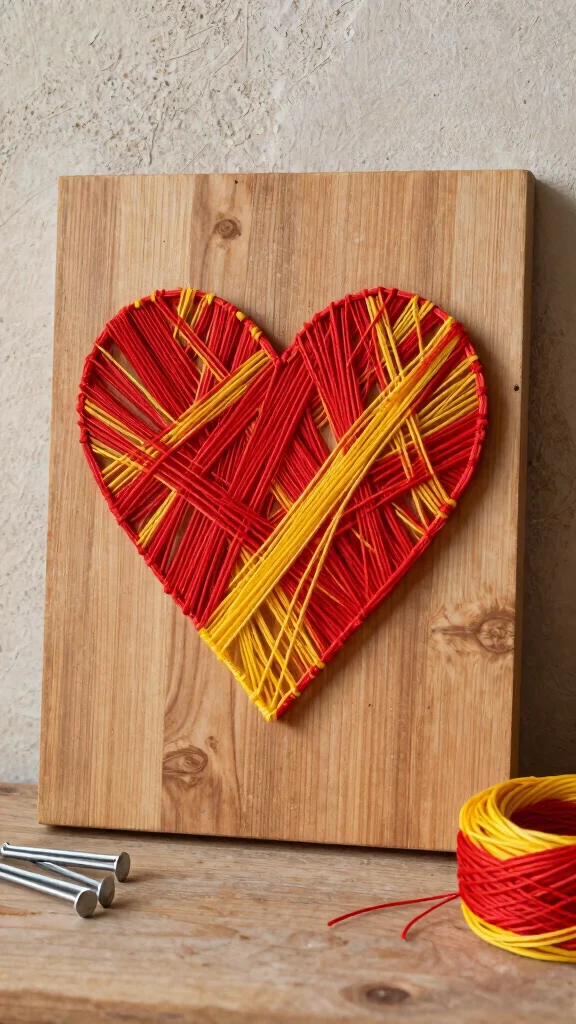
String art is a delightful way to merge creativity with simplicity. This DIY project allows you to create stunning designs using just a few basic materials. By hammering nails into a wooden board and wrapping colorful string around them, you can form beautiful patterns that add dimension to your walls.
Start by sketching a design on the board, such as a heart or your initials. Hammer the nails into place, leaving enough room for the string to flow freely. This interactive art piece not only showcases your artistic flair but also serves as a unique decorative element.
– Sketch your design lightly for guidance.
– Use contrasting string colors for visual impact.
– Wrap the string in various directions for texture.
– Finish by tying off the string securely.
Your string art will infuse your space with personality and charm, making it a perfect conversation starter.
7. Macramé Wall Hangings

Macramé is experiencing a revival, and for good reason! This fiber art technique transforms simple cords into beautiful wall hangings that radiate a bohemian vibe. With just a few materials, you can create intricate designs that add warmth and texture to your home.
Begin by cutting cotton cords into lengths that suit your design. Use various knotting techniques, like square knots or lark’s head knots, to craft unique patterns. This project is not only enjoyable but also serves as a calming activity.
– Cut cords to your desired lengths for flexibility.
– Experiment with different knot patterns for creativity.
– Hang your piece on a dowel for a polished finish.
– Trim excess cord for a clean look.
Your macramé wall hanging will introduce a soft, tactile element to your decor, elevating the overall aesthetic.
Difficulty Rating & Requirements
Overall Difficulty Rating: Medium
The DIY wall art projects range in difficulty, but overall, they can be classified as medium. Most of these easy wall art projects are suitable for beginners with some crafting experience. If you’re someone who enjoys hands-on activities and has a little patience, you’ll find these tasks rewarding and manageable.
Time Estimate:
⏱ Estimated time: 3-5 hours depending on the project
– Planning and Design: 1 hour for brainstorming and sketching your ideas.
– Materials Gathering: 1 hour to collect all necessary supplies.
– Creating the Art: 1-3 hours depending on the complexity of the project.
Skill Requirements:
– Required skills: Basic crafting abilities, some familiarity with tools, and a splash of creativity.
– Beginner-friendly: Yes, most projects are straightforward with clear steps to follow.
– Skills like painting, cutting, or arranging can be learned as you go. However, more intricate designs like macramé may require prior experience or practice.
Tools & Materials Needed:
🧰 Essential items checklist:
– Canvas or reclaimed wood (required)
– Paints or markers (required)
– Scissors (required)
– Glue or hot glue gun (required)
– String or yarn (optional, depending on the project)
– Embroidery hoops (optional, for specific wall art)
– Frames (optional, to enhance finished pieces)
– Natural elements like leaves or flowers (optional, for a nature-inspired look)
Step-by-Step Overview:
1. Planning Your Design: Spend about an hour sketching ideas or gathering inspiration online. Decide on colors and the overall look you want.
2. Gathering Materials: Allow an hour to collect all supplies. Check your home for items you might already have, like old fabric or paint.
3. Creating the Art: Dedicate 1-3 hours to the creation phase. If you’re making something intricate like mosaic tile art, allow for extra drying time.
4. Finishing Touches: Use the last 30 minutes to frame your art or add any final embellishments. This is where you can step back and see your work shine!
Professional vs DIY:
Creating your own wall art can be a fraction of the cost of hiring a professional. A commissioned piece might range from $150 to $500, depending on the artist’s experience and materials used. In contrast, most DIY projects can be accomplished for under $50, especially if you use upcycled materials. If you love personal touches in your home decor, tackling these projects yourself can be both fulfilling and economical. If you’re short on time or unsure about your skills, hiring a professional can save you the hassle and guarantee quality results.
8. Painted Rocks Canvas
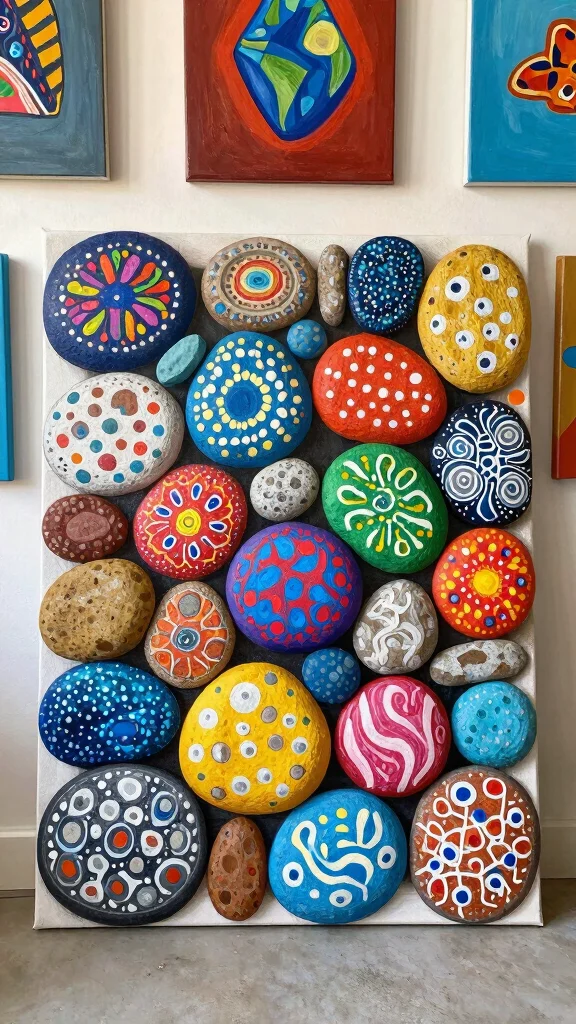
Turn painted rocks into a whimsical canvas art project that brings fun and creativity indoors! Collect smooth, flat rocks from your garden or a local park, and let your imagination run wild with colorful designs. This project is enjoyable for all ages and invites a playful spirit into your home.
After cleaning your rocks, use acrylic paints to create vibrant patterns, animals, or inspirational quotes. Once dry, arrange them on a canvas or wooden board for a delightful collage. This art piece not only adds a pop of color but also connects you with nature.
– Select smooth rocks for the best painting surface.
– Create a variety of designs for visual interest.
– Glue the rocks in a creative layout for a cohesive look.
– Consider using a sealant for outdoor display.
Your painted rock canvas will brighten up your space and serve as a cheerful reminder of your creativity.
You might also like
9. Upcycled Bottle Cap Art

Transform old bottle caps into a playful work of art that adds a quirky touch to your decor! This eco-friendly project is a fantastic way to repurpose materials while showcasing your creativity. Gather a variety of caps in different colors and materials to craft a unique design that reflects your personality.
Arrange the caps on a canvas or wooden board, and use strong adhesive to secure them in place. Once completed, this eye-catching piece will serve as a fun conversation starter in your home.
– Plan your design on the canvas before gluing.
– Mix colors and materials for an eclectic look.
– Allow the glue to dry completely before hanging.
– Incorporate other found objects for added texture.
Your upcycled bottle cap art will not only enhance your space but also showcase your commitment to sustainability.
10. DIY Mosaic Tile Art

Mosaic tile art is a captivating way to express your creativity while adding vibrancy to your walls. By using broken tiles, glass pieces, or ceramic dishes, you can create stunning designs that tell a story. This project allows you to experiment with colors and patterns, making each piece uniquely yours.
Start by breaking tiles into smaller pieces, then arrange them on a wooden canvas in your desired shape or pattern. Once you’re satisfied with the layout, use grout to fill in the gaps and secure the pieces in place. This art piece will bring warmth and character to your home.
– Choose a theme or color scheme for cohesion.
– Apply grout carefully to ensure stability.
– Use gloves for safety while handling broken tiles.
– Seal your mosaic with a clear coat for durability.
Your mosaic tile art will serve as a stunning focal point, enhancing the overall aesthetic of your space.
11. Framed Natural Elements Collage
Capture the essence of nature with a beautifully framed collage made from leaves, twigs, and flowers. This project allows you to showcase the beauty of the outdoors while adding a touch of tranquility to your home. By collecting natural elements, you can create a piece that resonates with your love for nature.
Arrange your finds artistically on thick paper or canvas, then frame them to protect and display your artwork. This simple yet elegant design creates a calming atmosphere that enhances any room.
– Collect a variety of natural elements for diversity.
– Use glue to secure items in place effectively.
– Choose a frame that complements your decor style.
– Press leaves beforehand to maintain their color.
Your natural elements collage will invite the beauty of the outdoors into your home and create a soothing environment.
12. Embroidery Hoop Wall Art
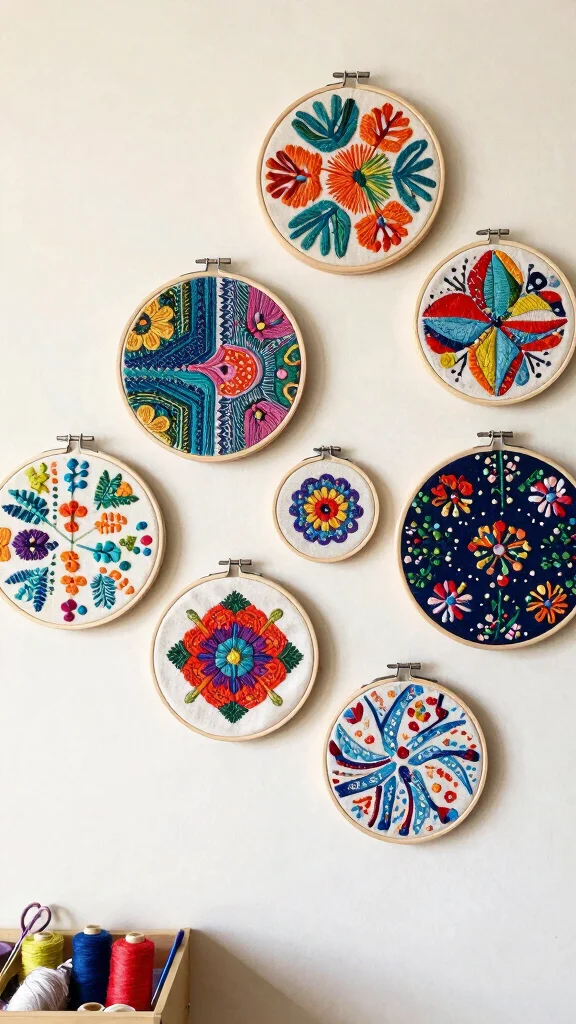
Add a whimsical touch to your decor with colorful embroidery hoop art! This project is a fun way to use leftover fabric or thrifted finds, creating a delightful display that brightens up any wall. By selecting different fabrics, you can craft unique pieces that showcase your personality.
Simply cut fabric into circles larger than your hoops and secure them inside. You can keep it simple or add designs and quotes through stitching for added flair. Hang multiple hoops together to create an eye-catching gallery wall.
– Mix and match fabric patterns for visual interest.
– Choose various hoop sizes for a dynamic arrangement.
– Stitch simple designs for extra texture.
– Use colorful threads to enhance your creations.
Your embroidery hoop art will infuse your space with charm and creativity, making it feel more personalized.
Fun fact: Upcycling fabric into embroidery hoop art can cut material costs by up to 50% and reduce waste, making wall art diy feel greener. Mix thrifted prints to spark unique, personality-filled walls. A few stitches turn scraps into showroom-worthy DIY wall art.
13. Chalkboard Wall Art

Chalkboard wall art combines creativity and functionality in a playful way! By applying chalkboard paint to a canvas or even an entire wall, you can create a space for doodles, quotes, or reminders that can be updated at any time. This versatile project invites spontaneity into your decor.
Once the chalkboard paint is dry, use colorful chalk to express your artistic side. You can easily change designs to reflect your mood or the season, making this project both fun and practical.
– Apply chalkboard paint evenly for a smooth surface.
– Use colorful chalk for dynamic designs.
– Frame the chalkboard with wood for added style.
– Seal with a clear top coat for durability.
Your chalkboard wall art will bring a lively element to your space while allowing you to express yourself creatively.
14. Color Blocked Wooden Art

Revamp your walls with stunning color-blocked wooden art! This project is an excellent way to utilize scrap wood or pallets, creating a modern look that fits seamlessly into any decor style. By planning your color scheme, you can achieve a beautiful balance of hues that enhance your space.
Cut the wood into various geometric shapes, and paint each piece in your selected colors. Once assembled, this art piece becomes a striking focal point in your home.
– Sand edges of the wood for a polished finish.
– Use painter’s tape for clean lines when painting.
– Secure pieces with strong adhesive or screws.
– Arrange in an eye-catching pattern for maximum impact.
Your color-blocked wooden art will add a contemporary touch to your decor, making your walls come alive.
15. Shadow Box Art
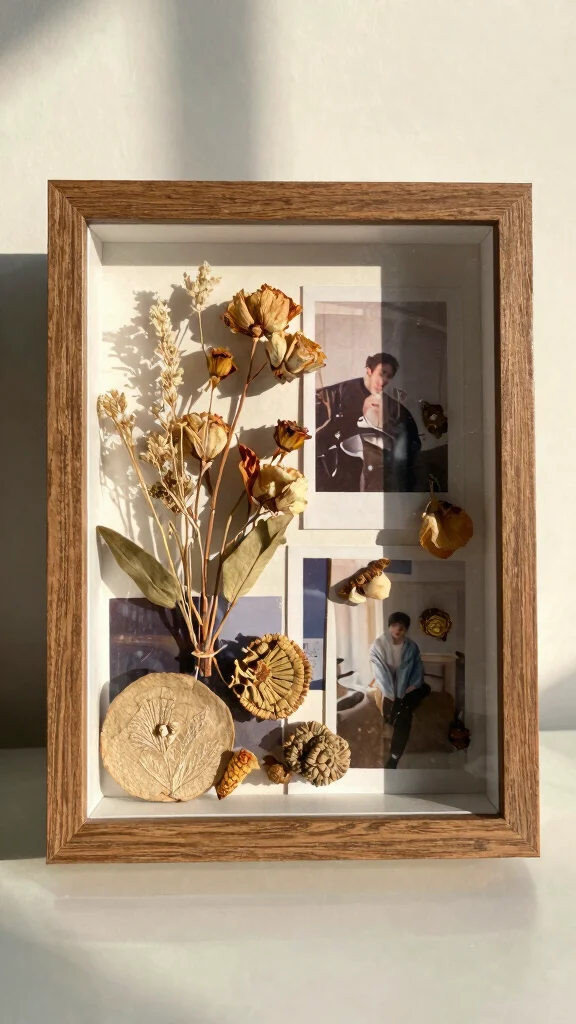
Create a stunning three-dimensional display with a shadow box art project! This unique craft allows you to showcase cherished items, like photographs, dried flowers, or keepsakes, in a creative way. By layering these treasures, you can add depth and personality to your decor.
Find a shadow box frame and arrange your selected items inside, securing them in place as needed. Consider painting the background to create contrast and highlight your display. This project beautifully combines nostalgia and artistry.
– Gather meaningful items for a personal touch.
– Layer items to create visual interest.
– Use glue or tape for secure placement.
– Paint the background for enhanced visibility.
Your shadow box art will become a captivating showcase of memories, adding character and warmth to your space.
Fun fact: A shadow box can add up to 3D depth with just 3 layered items—photos, dried flowers, and keepsakes. Paint the background to make colors pop, and your wall art diy becomes a storytelling centerpiece.
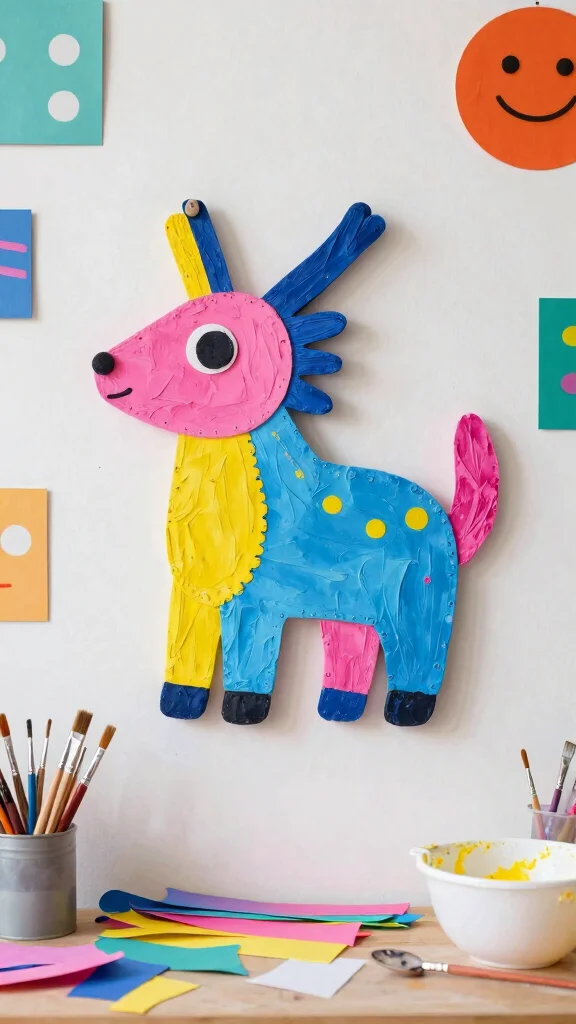
16. Hand-Drawn Wall Art
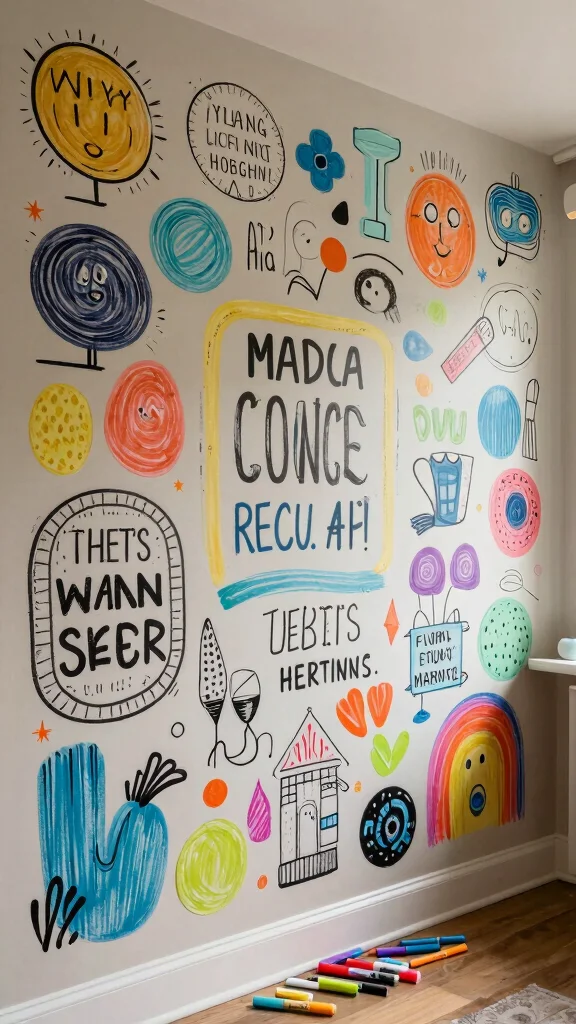
Transform your walls into a canvas for your artistic expression with hand-drawn wall art! Using chalk or washable markers, you can create vibrant murals, quotes, or doodles that reflect your personality. This DIY project is adaptable and allows you to change your designs as often as you like.
Choose a wall space where you can freely express your creativity. It’s a fun way to engage the whole family in a collaborative art project, making it a memorable activity.
– Plan your design lightly before filling in.
– Use stencils for cleaner lines if desired.
– Change designs regularly to keep things fresh.
– Consider using colored chalk for added vibrancy.
Your hand-drawn wall art will bring a playful element to your decor, making your space feel more inviting.
17. Terrarium Wall Art
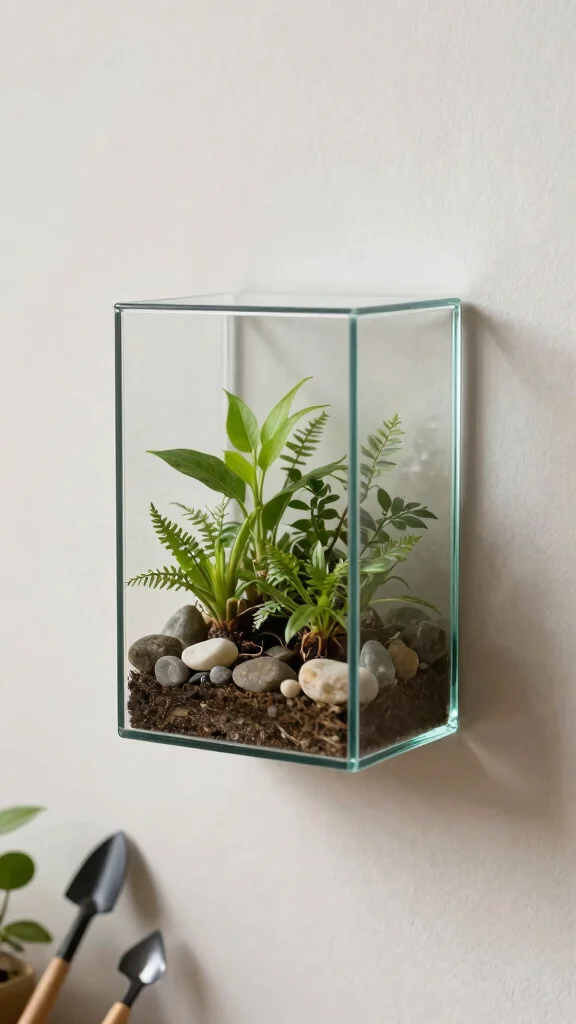
Introduce a slice of nature into your home with terrarium wall art! By using glass or clear plastic containers, you can create a miniature garden that serves as a stunning decor piece. This project not only beautifies your space but also enhances air quality and promotes tranquility.
Layer soil, small plants, and decorative stones inside the container, then secure it on the wall for an eye-catching display. This eco-friendly decor serves as a living art piece that brings freshness to your home.
– Choose low-maintenance plants for easy care.
– Use decorative stones to add texture.
– Arrange plants thoughtfully for visual appeal.
– Secure containers with brackets or shelves for stability.
Your terrarium wall art will bring a serene touch of greenery to your decor, making your space feel more alive.
18. Vintage Plate Wall Art
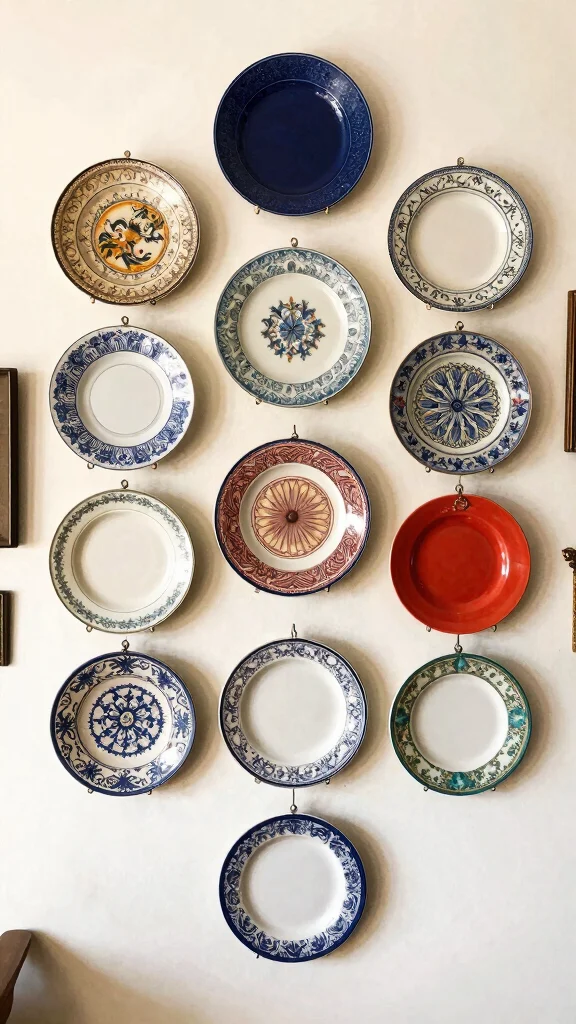
For a charming blend of vintage and modern decor, consider creating vintage plate wall art! Sourcing colorful plates from thrift stores or family collections can result in a delightful display that adds character to your walls. This project invites creativity and personal expression through the selection of unique finds.
Arrange the plates in an attractive pattern on your wall, using plate hangers or adhesive strips for secure mounting. This eye-catching display not only serves as decor but also sparks conversations about the stories behind each piece.
– Collect a variety of plate sizes and patterns.
– Plan your arrangement on the floor for balance.
– Use adhesive strips for easy placement and removal.
– Mix patterns for an eclectic and vibrant look.
Your vintage plate wall art will create a warm and inviting atmosphere, celebrating the beauty of cherished finds.
19. Recycled Paper Art

Turn ordinary scrap paper into extraordinary wall art by creating a recycled paper collage! This eco-conscious project allows you to minimize waste while producing something visually stunning. Gather old magazines, newspapers, or any scrap paper, and explore your creativity as you cut and arrange them into a design that speaks to you.
Use a canvas or thick paper as your base, and glue down your arranged pieces, allowing them to dry thoroughly. This project is perfect for involving kids, as it encourages exploration of creativity and recycling.
– Cut paper into various shapes for diversity.
– Arrange pieces creatively for a cohesive look.
– Use glue to secure everything in place.
– Display your collage proudly once dry.
Your recycled paper art will not only add a vibrant touch to your walls but also serve as a reminder of the beauty in reusing materials.
20. Miniature Garden Wall Art
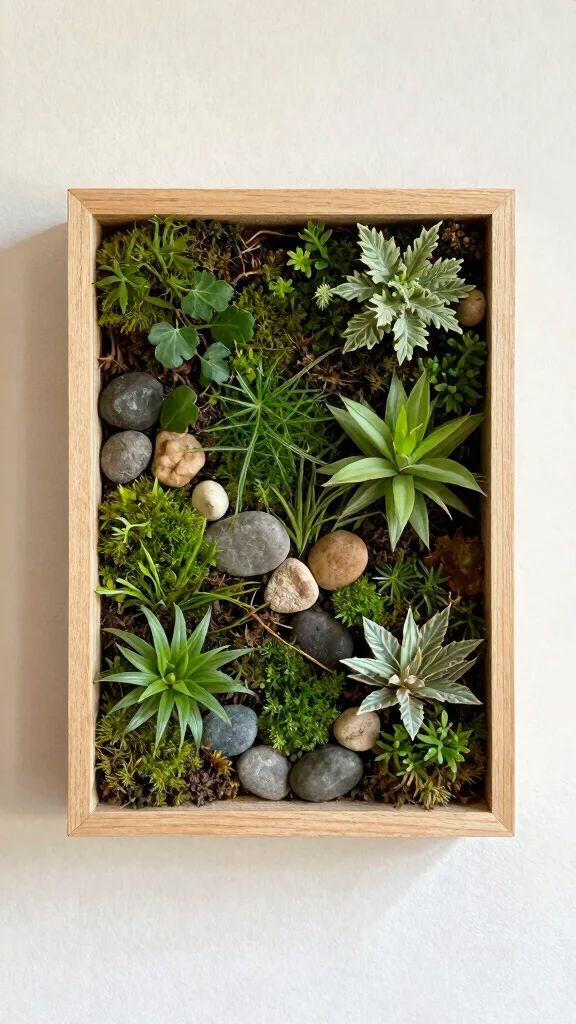
Create a captivating miniature garden scene to hang on your wall! Using a shallow frame, you can fill it with soil, small plants, and decorative moss or stones to form a living art piece. This project not only beautifies your space but also brings freshness and life indoors.
Once secured, hang your miniature garden in a bright area where it can thrive, making it a delightful conversation starter for guests. This living artwork adds a unique touch to your decor while promoting a sense of tranquility.
– Choose low-light plants if needed for easy maintenance.
– Layer decorative elements for visual depth.
– Secure plants firmly in the soil for stability.
– Water your garden regularly to keep it vibrant.
Your miniature garden wall art will infuse your space with natural beauty and a touch of life.
Conclusion

These 20 DIY wall art ideas show that creating beautiful decor can be as simple as using what you already have around you. Mixing creativity with sustainability not only brings charm to your space but also promotes a healthy environment.
Whichever project you choose, remember that each piece you create adds a personal touch to your home. So gather your materials, unleash your creativity, and start crafting your weekend masterpieces!
Frequently Asked Questions
What are some easy weekend wall art diy ideas that are sustainable and budget-friendly?
Here are a few crowd-pleasing, sustainable options you can tackle this weekend as part of your wall art diy lineup. Start by picking 1–2 ideas that fit your space and color palette. Gather eco-friendly materials: reclaimed wood, thrifted frames, fabric scraps, recycled canvases, and low-VOC paints or natural pigments. Plan a cohesive palette to match your home decor ideas.
Steps:
1) Prep your surface and materials.
2) Create using upcycling methods like fabric collage, pressed leaves on canvas, or a simple geometric design with paint.
3) Seal with a non-toxic finish.
4) Hang with proper hardware and spacing to ensure a polished look.
Tip: choose easy wall art projects that make a big impact without a big budget. This fits into weekend crafts and DIY home accents.
How can I choose sustainable materials for wall art diy without breaking the budget?
Smart shopping and upcycling can keep costs down while boosting impact for your wall art diy projects. Start with thrifted frames, reclaimed wood scraps, fabric remnants, scrap paper or magazines, and recycled canvases. Pick a simple project that uses 1–2 materials at a time to minimize waste. Consider using natural pigments or non-toxic paints to stay eco-friendly. Plan color palettes that align with your home decor ideas and pull accents from existing decor to tie the room together.
Budget tips: set a hard cap, reuse hardware, and choose a single focal piece to anchor the wall. Remember that sustainable materials often come with stories—embrace the DIY home accents by celebrating the upcycled background of your wall art diy.
What tools do I need to start DIY wall art projects this weekend?
Here are the essentials to kick off your wall art diy without overhauling your workspace. Basic hand tools (scissors, craft knife, ruler, pencil), adhesives (glue or hot glue gun, double-sided tape), paints and finishes (acrylic or water-based paints, sealer), and display hardware (nails or picture hooks). For fabric-based projects: fabric scissors and scrap fabric. If you’re refacing wood, have sandpaper handy. Optional: a cutting mat and level for precise layouts. Choose easy wall art projects that match your skill level to keep things simple this weekend.
How can I display multiple DIY wall art pieces to create a cohesive gallery wall?
Plan first, then hang with purpose. Start with measuring the wall and decide between a grid or salon-style layout. Pick frames or mats in a common color or finish to unify the pieces, and use a coordinated color palette across all works to tie them together as creative wall decorations. Arrange 3–5 pieces with intentional negative space, using spacing of about 2–4 inches between frames. Test layouts on the floor or paper templates before hammering in nails, and anchor the display with a larger focal piece at eye level for a polished, cohesive look that enhances your home decor ideas.
What are quick upcycling ideas for wall art diy that look high-end?
Turn thrift-store finds into luxe-looking pieces with simple upcycling. Try: 1) Framing a bold fabric art using a thrifted frame; 2) Creating a geometric wood wall art from reclaimed boards; 3) Applying a metallic leaf overlay on a salvaged panel; 4) Decoupage with vintage maps or botanical prints on a wood plaque; 5) Mounting pressed leaves or thin pressed flowers for natural texture. Finish with a protective sealant and keep textures muted for a sophisticated vibe. These DIY home accents and creative wall decorations stay sustainable while delivering a high-end look.
Related Topics
wall art diy
sustainable decor
easy wall art
weekend crafts
creative home accents
budget friendly
beginner friendly
upcycled art
modern design
home styling
decorative projects
quick crafts
Leave a Reply